If your store uses an older Shopify theme (often called “Vintage” or “Shopify 1.0” themes), you might not see the Genlook Widget app block available in your Theme Editor. Don’t worry! You can still install the widget by pasting a small code snippet into a Custom Liquid block. This guide will walk you through the process step-by-step.
1

Enable the Genlook App Embed

First, we need to load the underlying Genlook engine on your store.
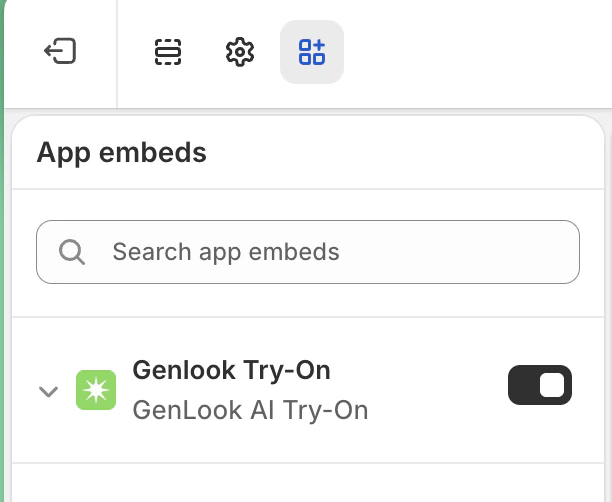
  1. Go to your Shopify Admin and click Online Store > Themes.
  2. Click Customize on your active theme.
  3. In the left sidebar, click the App embeds icon (the icon that looks like a block with a spark).
  4. Find Genlook Try-On and toggle it ON.
  5. Click Save in the top right corner.
Shopify Theme Editor showing the Genlook Try-On app embed toggle enabled
2

Add a Custom Liquid block

Next, we need to place the button on your product page.
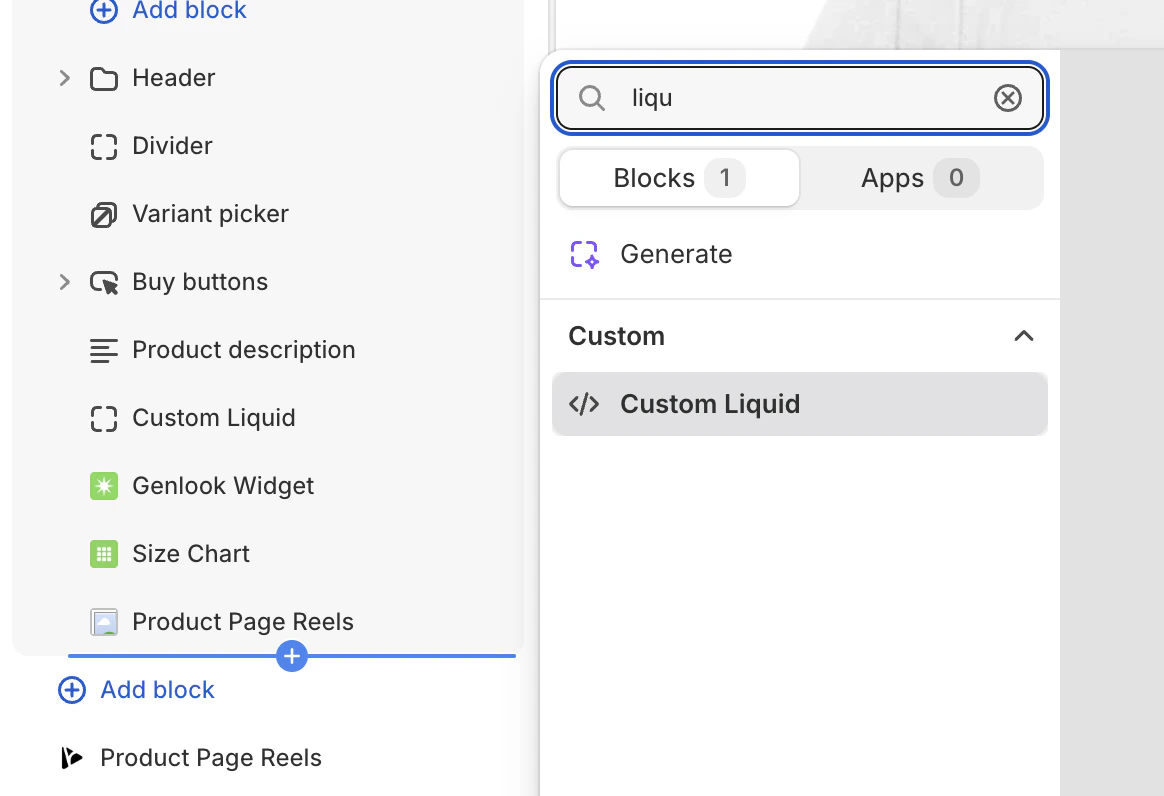
  1. Still in the Theme Editor, use the top dropdown menu to select your Products > Default product template.
  2. In the left sidebar under the “Product Information” section, click Add block.
  3. Select Custom Liquid.
  4. Drag this new block to where you want the button to appear (we recommend placing it right below the “Add to cart” button).
Shopify Theme Editor showing how to add a Custom Liquid block
3

Paste the Genlook snippet

Click on the Custom Liquid block you just added, and paste the following code into the input box:
{%- liquid
  assign ns = 'app--283488092161'
  assign show_widget = false
  assign collection_enabled = false
  assign product_genlook_enabled = null
  
  if product and product.id != null
    assign product_genlook_enabled = product.metafields[ns].genlook_enabled.value
  endif
  
  if product and product.collections
    for collection in product.collections
      if collection.metafields[ns].genlook_enabled.value
        assign collection_enabled = true
        break
      endif
    endfor
  endif
  
  if product_genlook_enabled or collection_enabled
    assign show_widget = true
  endif
  
  if request.design_mode
    assign show_widget = true
  endif
-%}

{% if show_widget %}
<style>
  .genlook-basic-btn {
    display: flex;
    align-items: center;
    justify-content: center;
    gap: 8px;
    width: 100%;
    padding: 12px 18px;
    background-color: #0A1810;
    color: #ffffff;
    border: none;
    border-radius: 8px;
    font-size: 14px;
    font-weight: 600;
    cursor: pointer;
    transition: opacity 0.2s ease;
  }
  .genlook-basic-btn:hover {
    opacity: 0.9;
  }
</style>

<!-- The Try-On Button -->
<button type="button" class="genlook-basic-btn" onclick="window.Genlook.cabin.open()">
  <svg width="16" height="16" fill="none" stroke="currentColor" viewBox="0 0 24 24" xmlns="http://www.w3.org/2000/svg">
    <path stroke-linecap="round" stroke-linejoin="round" stroke-width="2" d="M5 3v4M3 5h4M6 17v4m-2-2h4m5-16l2.286 6.857L21 12l-5.714 2.143L13 21l-2.286-6.857L5 12l5.714-2.143L13 3z"></path>
  </svg>
  Virtual Try-On
</button>

<!-- Widget Configuration -->
<script type="application/json" id="genlook-cabin-config">
{
  "preload": true,
  "theme": {
    "color": "#0A1810"
  }
}
</script>

<!-- Product Data -->
{% if product and product.id != null %}
  <script type="application/json" id="genlook-page-product">
    {
      "id": {{ product.id | append: '' | json }},
      "title": {{ product.title | json }},
      "url": {{ product.url | json }},
      "featured_image": {{ product.featured_image.src | json }},
      "variants": [
        {%- for variant in product.variants -%}
          {
            "id": {{ variant.id | json }},
            "featured_image": {{ variant.featured_image.src | json }}
          }{% unless forloop.last %},{% endunless %}
        {%- endfor -%}
      ]
    }
  </script>
{% endif %}
{% endif %}
Click Save. You should now see a styled “Virtual Try-On” button on your product page!

Customizing the Colors

The snippet above provides a dark green button by default (#0A1810). You can easily change this to match your brand. Look for the <style> section at the very top of the snippet. You can change the background-color and color (text color) values:
  .genlook-basic-btn {
    ...
    background-color: #YOUR_COLOR; /* Changes the button background */
    color: #ffffff; /* Changes the text color */
    ...
To change the primary color of the inside of the popup modal (like the loading spinners), update the color inside the <script id="genlook-cabin-config"> tag further down the snippet:
"theme": {
  "color": "#YOUR_COLOR"
}
If you want to configure more advanced text or behavioral settings (like gender, subtitles, or showing remaining credits), check out the full configuration options here.

Ask AI to style the button for you

If you aren’t familiar with CSS but want the button to perfectly match the rest of your website, you can use an AI tool like ChatGPT or Claude to do it for you! Just copy and paste this prompt:
I am adding a custom HTML button to my Shopify store. 
Here is the code I am currently using:

<style>
  .genlook-basic-btn {
    display: flex;
    align-items: center;
    justify-content: center;
    gap: 8px;
    width: 100%;
    padding: 12px 18px;
    background-color: #0A1810;
    color: #ffffff;
    border: none;
    border-radius: 8px;
    font-size: 14px;
    font-weight: 600;
    cursor: pointer;
    transition: opacity 0.2s ease;
  }
  .genlook-basic-btn:hover {
    opacity: 0.9;
  }
</style>

Please update the CSS inside the <style> tags to make the button look like this:
- The background color should be [YOUR COLOR HERE, e.g. "bright red" or "#FF0000"]
- The text color should be [YOUR COLOR HERE, e.g. "white"]
- The corners should be [e.g. "fully rounded" or "sharp/square"]
- Remove the icon next to the text [Optional: keep or delete this line]

Only give me the updated <style> block back.
Once the AI gives you the new <style> block, just replace the old <style> block in your Custom Liquid snippet with the new one.

Need help?

If you get stuck, your button isn’t showing up, or you just want someone to handle it for you, please reach out to our team! We are always happy to log into your store and set it up for you completely free of charge. You can contact us at support@genlook.app.