Setup
Enable the Genlook Try-On app embed
In the Shopify Theme Editor, open App embeds (bottom of the left sidebar) and toggle on Genlook Try-On. This loads the Genlook SDK globally on every page and manages whether the widget is enabled for the current product.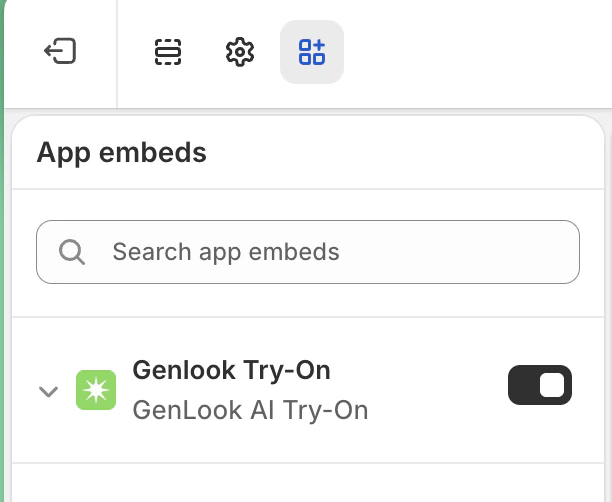
How it works
The Genlook Try-On app embed loads the SDK and store-level configuration on every page. Thegenlook-custom-button CSS class is special: its visibility is automatically managed by the app embed. If try-on is not enabled for the current product, the app embed will automatically hide any element with this class. This means you can safely add the button to your global product template without complex conditional Liquid logic - it will only appear where it should.
Your custom button simply calls window.Genlook.cabin.open() to launch the modal.
genlook-custom-button- Use this class to have the button automatically hide on products that do not have try-on enabled.genlook-cabin-config- an optional JSON script tag the SDK reads on initialization to override specific settings for the current page. Set"preload": trueto eagerly load the widget JS in the background (see the options below).
Where the widget reads its settings
The widget gets its appearance and behavior from two layers, and the per-page tag wins for any field it explicitly sets:- Widget Design tab (Genlook admin → Widget Design). Store-wide settings — color, copy, grammar gender, etc. Saved to a shop metafield and auto-rendered on every product page by the Genlook Try-On app embed. Most merchants only need this.
-
genlook-cabin-configscript tag (per page). Overrides individual fields for the page it’s rendered on. You write it by hand in your product template.
The merge is per-field. A per-page
theme.color overrides only the color and leaves dashboard copy/gender/etc.
untouched. To “use the dashboard value”, just omit the field from genlook-cabin-config.When to use which
- No customization needed → install the app, add a button block from the theme editor, done.
- Brand the widget once across the whole store → set values in the Widget Design tab in the Genlook dashboard. No code.
- Override on a specific product or template → emit
genlook-cabin-configon that page with only the fields you want to override.
genlook-cabin-config Reference
The genlook-cabin-config script tag is a JSON object that the SDK reads on initialization. You provide it manually. Every field shown below is also configurable through the Widget Design tab in the merchant dashboard — values you put here win for the current page.
Options
Eagerly load the widget JavaScript in the background when the page loads. When
true, the first open() call is
near-instant. When false or omitted, the widget JS is loaded on-demand when open() is first called - still fully
functional, just slightly slower on first open.Display a counter inside the widget showing how many try-on generations the visitor has left for the current period
(daily or weekly).
Grammatical gender for languages like Hebrew and Arabic that have gendered grammar. Accepted values:
"default",
"male", "female".Visual theming for the widget modal.
Override the default text shown inside the widget.
Setting
preload to false does not disable the widget. You can always call Genlook.cabin.open() regardless of
the preload setting - the SDK will lazy-load the widget automatically.SDK Reference
Genlook.cabin.preload
Type: boolean
Indicates whether the widget JS was eagerly loaded on page initialization. This reflects the preload value from the genlook-cabin-config JSON.
Genlook.cabin.open()
Opens the try-on widget modal. If the widget JS hasn’t been loaded yet, it is automatically fetched, and the modal opens as soon as it’s ready.
Genlook.cabin.fetch(url, options)
Performs an authenticated fetch request through the Shopify app proxy. Use this helper for all endpoint calls if you need to make direct API requests without handling the proxy path yourself.
/apps/proxy_genlook-x/public) is prepended automatically.
Next Steps
- Want to abandon the pre-built modal and build a completely custom UI? See the Full Custom Flow.